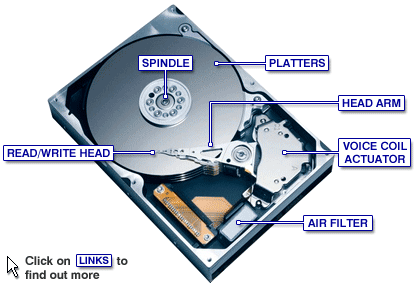
loading... Computer Tips And Tricks || Free Software || computer hacking
Showing posts with label hardware. Show all posts

Saturday, 4 August 2012

What is a Hard Disk Drive?:


Hard Disk Drive:

The hard disk drive is the main, and usually largest, data storage device in a computer. The operating system, software titles and most other files are stored in the hard disk drive.


The Hard Disk Drive is Also Known As:HDD (abbreviation), hard drive, hard disk, fixed drive, fixed disk, fixed disk drive
Important Hard Disk Drive Facts:The hard drive is sometimes referred to as the "C drive" due to the fact that Microsoft Windows designates the "C" drive letter to the primary partition on the primary hard drive in a computer by default.While this is not a technically correct term to use, it is still common. For example, some computers have multiple drive letters (e.g. C, D, E) representing areas across one or more hard drives.Popular Hard Disk Drive Manufacturers:


Hard Disk Drive Description:A hard drive is usually the size of a paperback book but much heavier.The sides of the hard drive have pre drilled, threaded holes for easy mounting in the 3.5 inch drive bay in the computer case. Mounting is also possible in a larger 5.25 inch drive bay with an adapter. The hard drive is mounted so the end with the connections faces inside the computer.The back end of the hard drive contains a port for a cable that connects to the motherboard. The type of cable used will depend on the type of drive but is almost always included with a hard drive purchase. Also here is a connection for power from the power supply.Most hard drives also have jumper settings on the back end that define how the motherboard is to recognize the drive when more than one is present. These settings vary from drive to drive so check with your hard drive manufacturer for details.

What is a Power Supply Unit?:


Power Supply Unit:


The hard disk drive is the main, and usually largest, data storage device in a computer. The operating system, software titles and most other files are stored in the hard disk drive
The power supply unit's job is to convert the power provided from the outlet into usable power for the many parts inside the computer case.

PSU, power supply, power pack, power converter
Motherboards, cases and power supplies all come in different sizes called form factors. All three must be compatible to work properly together.
A PSU is not usually user serviceable. For your safety, it's usually wise to never open a power supply unit.
CoolMax, Ultra, (Most power supply units are preinstalled in computer cases)


The Power Supply Unit is Also Known As:

Important Power Supply Unit Facts:

Popular Power Supply Unit Manufacturers:

Power Supply Unit Description:The power supply unit is mounted just inside the back of the case.The side of the PSU facing outside the case has a male, three pronged port that a power cable, connected to a power source, plugs into. There is also often a power switch and apower supply voltage switch.Large bundles of colored wires extend from the opposite side of the power supply unit into the computer. Connectors at the opposite ends of the wires connect to various components inside the computer. Some are specifically designed to plug in to the motherboard while others have connectors that fit into fans, floppy drives, hard drives, optical drives, and even some high powered video cards.Power supply units are rated by wattage to show how much power they can provide to the computer. Since each computer part requires a certain amount of power to function properly, it's important to have a PSU that can provide the right amount. The very handy Journey Systems Power Supply Calculator tool can help you determine how much you need.

RAM (RANDOM ACCESS MEMORY)


What is RAM?:


Random Access Memory (RAM) is the "working memory" in a computer. Additional RAM allows a computer to work with more information at the same time which can have a dramatic effect on total system performance.
main memory, internal memory, primary storage, memory "stick", RAM "stick"
RAM is typically referred to simply as "memory" even though other types of memory may exist inside a computer.
Each motherboard supports only a certain range of memory types in certain combinations so always check with your motherboard manufacturer before making a purchase.
KingstonPNYCrucial Technology
Comparison of memory modules for desktop PCs (DIMM).
Physical DDR layout
Comparison of memory modules for portable/mobile PCs (SO-DIMM).Chips and modules
A standard "module" or "stick" of desktop memory is long, thin and resembles a short ruler. The bottom of the memory module has one or more notches to guide for proper installation and is lined with numerous, usually gold-plated connectors.
Memory is installed in memory module slots located on the motherboard. These slots are easily locatable by looking for the small hinges on either side that lock the memory in place. Certain sizes of modules may need to be installed in certain slots so always check with your motherboard manufacturer before purchase or installation.
Memory modules come with various storage capabilities. Modern memory modules can be purchased in 256MB, 512MB, 1GB, 2GB, 4GB, and 8GB sizes.

RAM is Also Known As:

Important RAM Facts:

Popular RAM Manufacturers:

RAM Description:

WORKING OF CPU


What is a CPU?:The Central Processing Unit (CPU) is responsible for interpreting and executing most of the commands from the computer's hardware and software.The CPU could be considered the "brains" of the computer.The CPU is Also Known As:processor, computer processor, microprocessor, central processor, "the brains of the computer"
Important CPU Facts:Not all central processing units have pins on their bottom sides, but in the ones that do, the pins are easily bent. Take great care when handling, especially when installing onto the motherboard.Each motherboard supports only a certain range of CPU types so always check with your motherboard manufacturer before making a purchase.Popular CPU Manufacturers:IntelAMDCPU Description:A modern CPU is usually small and square with many short, rounded, metallic connectors on its underside. Some older CPUs have pins instead metallic connectors.The CPU attaches directly to a CPU "socket" (or sometimes a "slot") on the motherboard. The CPU is inserted into the socket pin-side-down and a small lever helps to secure the processor.After running even a short while, modern CPUs can get very hot. To help dissipate this heat, it is necessary to attach a heat sink and a fan directly on top of the CPU. Typically, these come bundled with a CPU purchase.Other more advanced cooling options are also available including water cooling kits and phase change units. 


7 Free Hard Drive Testing Programs


A List of the Best Free Hard Drive Test Software Available


There are many free hard drive testing tools available to help you determine what, if anything, is wrong when you suspect there may be a problem with a hard drive.
Some of these tools may be built in to your operating system already while others are available from hard drive manufacturers.
Important: Replace your hard drive if it fails any of your tests.
Note: Several excellent premium hard drive testing tools are available as well.

1. Seagate SeaTools

Seagate SeaTools for DOS
Seagate SeaTools is free hard drive testing software that comes in two forms for home users:
  • SeaTools for DOS supports Seagate or Maxtor drives and runs independent from your operating system on its own CD or disk, making it highly reliable.
  • SeaTools for Windows is a program that installs on your Windows system. You can do basic and advanced testing of any kind of drive - internal or external - from any manufacturer.
For those looking for SeaTools Desktop, SeaTools Online, or Maxtor's PowerMax software, please note that the two tools above have replaced all three. Seagate now owns the Maxtor brand.
Note: You do not need to own a Seagate or Maxtor hard drive to use SeaTools.


2.
 Microsoft Windows Built-In Error Checking


Hitachi Drive Fitness Test
Hitachi Drive Fitness Test is free hard drive diagnostic software available for use on most drives available today.
The Hitachi Drive Fitness Test software is available as an ISO file which can be burned to a CD and then used to boot the computer. See the installation instructions from Hitachi in the link below for details.
Note: You do not need to own a Hitachi hard drive to use Drive Fitness Test (DFT).


3. Hitachi Drive Fitness Test


Error Checking, sometimes referred to as scandisk, is a hard drive testing tool that comes with Microsoft Windows that can scan your hard drive in search of a wide range of errors.
This tool can also attempt to correct a number of hard drive problems.
How to Scan Your Hard Drive Using Built-In Error Checking in Windows


4. Samsung HUTIL

Samsung HUTIL Hard Drive Diagnostic Test
Samsung HUTIL is a free hard drive diagnostic utility for Samsung hard drives. HUTIL is sometimes called ES-Tool.
Samsung's HUTIL tool is available as an ISO image for burning to a CD. This makes HUTIL operating system independent and a better testing tool, in general, than those designed for use within Windows. It's also possible to run HUTIL from a bootable floppy disk.
Note: HUTIL will only test Samsung hard drives. HUTIL will load and find your non-Samsung drive you will not be able to run any diagnostics on the drive.

5. Western Digital Data Lifeguard Diagnostic


Western Digital Data Lifeguard Diagnostic is free hard drive testing software designed for Western Digital branded hard drives only.
The Western Digital Data Lifeguard Diagnostic software is available in a bootable, ISO format and allows for a number of hard drive tests. See the installation instructions from Western Digital in the link below for details.
Note: Data Lifeguard Diagnostic will also run diagnostics on hard drives from other manufacturers but the primary drive in the computer must be a Western Digital drive.

6. Fujitsu Diagnostic Tool

Fujitsu Diagnostic Tool is a free hard drive testing tool designed for Fujitsu hard drives.
The Fujitsu Diagnostic Tool (FJDT) is available in both a Windows version and an operating system independent, bootable DOS version. Unfortunately, the bootable version is designed for floppy disks - a CD image is not available.
Two tests are available with Fujitsu Diagnostic Tool, a "Quick Test" (about 3 minutes) and a "Comprehensive Test" (time will vary based on hard drive size).
Note: Fujitsu Diagnostic Tool will perform hard drive tests on Fujitsu drives only. If you have any other make of hard drive, try one of the manufacturer independent tests listed toward the beginning of this list.

7. Bart's Stuff Test

Bart's Stuff Test 5 - Hard Drive Test
Bart's Stuff Test is a free, Windows-based hard drive stress test.
There aren't a lot of options in Bart's Stuff Test and it's not as thorough as some other tests on this list. However, it's a decent addition to your hard drive testing arsenal, especially if you're having problems testing with an ISO based tool above but want something besides Window's default tool.

5 Free Memory Test Programs


                                   Memory test software, often called RAM test software, are programs that perform detailed tests of your computer's memory system.
The memory installed in your computer is very sensitive. It's always a good idea to perform a memory test on newly purchased RAM to test for errors. Of course a memory test is always in order if you suspect that you may have a problem with your existing RAM.
Note: All of the memory testing programs listed function from outside of Windows so each will work no matter if you have Windows (7, 8, XP, etc.), Linux, or any PC operating system.
Important: If your memory tests fail, replace the memory immediately. The memory hardware in your computer is not repairable and must be replaced if it fails.

 1. Memtest86


Free Memory Testing Tools - Memtest86

Memtest86 is a completely free, stand-alone, and extremely easy to use memory test software program. If you only have time to try one memory test tool on this page, try Memtest86.
Simply download the ISO image from Memtest86's site and burn it to a disc. After that, just restart to boot from the disc and you're off.
While this RAM test is free, BradyTech Inc. can ship you a CD with Memtest86 preinstalled, plus detailed documentation, all for around $10USD.
Unless you're a hardware developer or other expert, the free download and free basic support available on the site should be enough.
I highly recommend Memtest86!

2. Windows Memory Diagnostic

Free Memory Testing Tools - Windows Memory Diagnostic

Windows Memory Diagnostic is a free memory test program provided by Microsoft. Very similar to other RAM test programs, Windows Memory Diagnostic performs a series of extensive tests to determine what, if anything, is wrong with your computer memory.
Important: You do not need to have Windows (or any operating system) installed to use Windows Memory Diagnostic.
Simply download the installer program and then follow the instructions to create a bootable floppy disk or ISO image for burning to a disc like a CD, DVD, etc.
After booting to the disc or floppy disk, Windows Memory Diagnostic will automatically begin testing the memory and will repeat the tests until you stop them. If the first set of tests finds no errors, chances are your RAM is good.

3. M2K MemScope

Free Memory Testing Tools - M2K MemScope

M2K MemScope is a free memory test program from the makers of Micro-Scope - a large suite of professional, time tested (and expensive) computer diagnostic tools.
MemScope performs a wide variety of tests in an attempt to locate even the smallest issue with your memory. Many advanced testing options are available but the "Run All" test is equivalent to tests in other programs and is a safe bet if you're not a memory expert.
MemScope is freely downloadable from M2K's site, linked below. You will have to fill out a short form but you're quickly brought to the download link. I couldn't get the provided ISO file to work but I did use the "MemScope installer" option to create a bootable floppy disk without problem.

4. Memtest86+

Free Memory Testing Tools - Memtest86+

Memtest86+ is a modified and presumably more up-to-date version of the original Memtest86 memory test program, profiled in the #1 position above. Memtest86+ is also completely free.
I would recommend performing a memory test with Memtest86+ if you have any problems running the Memtest86 RAM test or if Memtest86 reports errors with your memory and you'd like a really good second opinion.
It might seem a bit strange that I rank Memtest86+ as the #4 pick, but since it's so incredibly similar to Memtest86, your best bet is to try Memtest86 followed by my #2 and #3 picks, both of which operate differently, providing you with a more well-rounded set of memory tests.

5. DocMemory Memory Diagnostic


Free Memory Test Tool - DocMemory Memory Diagnostic

DocMemory Memory Diagnostic is yet another computer memory test program and works very similarly to the other programs I have listed above.

One major disadvantage of using DocMemory is that it requires that you create a bootable floppy disk. Most computers today don't even have floppy drives. The better memory test programs (above) use bootable discs like CDs and DVDs instead.
I would recommend using DocMemory Memory Diagnostic only if the memory testers I have listed above do not work for you or if you'd like yet one more confirmation that your memory has failed.
On the other hand, if your computer isn't able to boot a disc, which is what most of the above programs require, DocMemory Memory Diagnostic may be exactly what you've been looking for.


tic v3.1

Maintaining Your Computer


If you've ever fried a CPU because you didn't clean your fan, lost a decade of your digital life to a hard drive crash, or spent four hours trying to remove a nasty virus, you learned a valuable lesson about the need to maintain your computer.
Medical experts remind us that "prevention is the best medicine" so as your personal computer support expert, I'm going to strongly advise that you apply the same logic to your computer!
These resources will help you keep your computer running in tip-top shape for as long as you choose to own it.
  1. Backup Your Data
  2. Update! Update! Update!
  3. Keep Your Computer Clean

Backup Your Data

The most important thing you can do as a computer owner is to consistently and reliably back up the data stored on your hard drive. Hardware used to be the most valuable part of a computer but those bits and bytes are now the real investment.
You've spent huge amounts of money on software and digital music and video, and countless hours authoring documents and organizing your digital files. If you don't regularly backup this information, a serious computer problem could leave you with nothing but a huge feeling of regret.
Now that I've scared you a bit, use these resources to keep your data safe!
  • Best Backup Software Titles


  • Best Online Backup Services

. CrashPlan+


. CrashPlan+


. ADrive


. AVG LiveKive


. Backblaze


Keeping the software on your computer updated is no longer an optional part of computer ownership. Viruses, worms, junk mail, security breaches, hardware incompatibilities, and software conflicts are all now part of your daily digital life.Update! Update! Update!

Updating your computer with the latest patches, fixes, and device drivers really can keep these annoyances at bay. Updates are freely available on the Internet for just about every antivirus program, email client, operating system, and piece of hardware you could possibly own.
These resources can help you locate these updates and keep your computer out of harm's way.
  • Manufacturer Support Sites
  • Driver Search Sites

Keep Your Computer Clean

We all know that most things run a little better when they're clean. Water flows easier when your plumbing is clean, your car's engine runs better if you've been taking care of it, and your dryer does more in less time when you clean out the lint.
Your computer is no different. Keeping your files and folders tidy in your virtual world and clearing the dust and grime that builds up inside and outside your computer all play a part in keeping it running smooth day in and day out.
  • The Right Way to Clean a Flat Screen (LCD) Monitor
  • Clean Out the Temp Folder (Vista)
  • Clear the Internet Cache in Firefox
  • Clear the Temporary Internet Files in IE

How To Fix a Blue Screen of Death


A Blue Screen of Death also called a STOP Error, will appear when an issue is so serious that Windows must stop completely.

A Blue Screen of Death is usually hardware or driver related. Most BSODs show a STOP code that can be used to help figure out the root cause of the Blue Screen of Death.
Did your PC restart after the BSOD? If the blue screen flashed and your computer rebooted automatically before you had time to read anything, see Tip #3 at the bottom of the page.
Note: Some of these steps may require you to start Windows in Safe Mode. If that's not possible then skip those steps.

  1. The most important Blue Screen of Death troubleshooting step you can take is to ask yourself what you just did.
    Did you just install a new program or a piece of hardware, update a driver, install an update, etc.? If so, there's a very good chance that the change you made caused the BSOD.
    Undo the change you made and test again for the STOP Error. Depending on what change you made, some solutions might include:
    • Startup using Last Known Good Configuration to undo recent registry and driver changes.
    • Use System Restore to undo recent system changes.
    • Roll Back device driver to version prior to your driver update.
  2. Verify that a minimum amount of free space is available on your Windows partition. Blue Screens of Death and other serious issues, like data corruption, can occur if there's not enough free space on your primary partition used for the Windows operating system.
    Note: Microsoft recommends that you maintain at least 100MB of free space but I regularly see problems with free space that low. I usually advise Windows users to keep at least 15% of a drive's capacity free at all times.
  3. Scan your computer for viruses. Some viruses can cause a Blue Screen of Death, especially ones that infect the master boot record (MBR) or boot sector.
    Important: Make sure your virus scanning software is completely up to date and that it's configured to scan the MBR and boot sector.
  4. Apply all available Windows service packs and other updates. Microsoft regularly releases patches and service packs for their operating systems that may contain fixes for the cause of your BSOD.
  5. Update drivers for your hardware. Most Blue Screens of Death are hardware or driver related so updated drivers could fix the cause of the STOP error.
  6. Check the System and Application logs in Event Viewer (7/Vista | XP) for errors or warnings that might provide more clues on the cause of the BSOD.
  7. Return hardware settings to default in Device Manager. Unless you have a specific reason to do so, the system resources that an individual piece of hardware is configured to use in Device Manager should be set to default. Non-default hardware settings have been known to cause a Blue Screen of Death.
  8. Return BIOS settings to their default levels. An overclocked or misconfigured BIOS can cause all sorts of random issues, including BSODs.
    Note: If you've made several customizations to your BIOS settings and don't wish to load the default ones then at least try returning clock speed, voltage settings, and BIOS memory options to their default settings and see if that fixes the STOP error.
  9. Make sure all internal cables, cards, and other components are installed and seated properly. Hardware that's not firmly in place can cause a Blue Screen of Death so try reseating the following and then test for the STOP message again:
    • Reseat all internal data and power cables
    • Reseat the memory modules
    • Reseat any expansion cards
  10. Perform diagnostic tests on all hardware you're able to test. It's highly likely that the root cause of any given Blue Screen of Death is a failing piece of hardware:
    • Test your system memory
    • Test your hard disk drive
    If a test fails, replace the memory or replace the hard drive as soon as possible.
  11. Update your BIOS. In some situations, and outdated BIOS could cause a Blue Screen of Death due to certain incompatibilities.
  12. Start your PC with essential hardware only. A useful troubleshooting step in many situations, including BSOD issues, is to start your computer with the minimum hardware necessary to run the operating system. If your computer starts successfully it proves that one of the removed hardware devices was the cause of the STOP message.
    Tip: Typically, the only necessary hardware for starting your PC through to the operating system includes the motherboard, CPU, RAM, primary hard drive, keyboard, video card, and monitor.

Tips:

  1. Find that hardware is the cause of your Blue Screen of Death? Try this:

    • Replace the hardware.
    • Update the hardware's firmware.
    • Make sure the hardware is on the Hardware Compatibility List.
    • Check with the manufacturer for support information.
  2. Find that a software program is the cause of your Blue Screen of Death? Try this:

    • Reinstall the software.
    • Check for and install any available program updates.
    • Check with the developer for support information.
    • Try a competing program.
  3. Is your PC restarting before you can read the STOP Code on the Blue Screen of Death?

    Most Windows PCs are configured to reboot immediately after receiving a serious error like a BSOD. You can prevent this reboot by disabling the automatic restart on system failure option.

How To Troubleshoot a Computer That Turns On and Then Immediately Turns Off


                                  Is your computer turning off by itself immediately or at some point before the operating system loads? If so, you may be facing anything from an electrical short to a serious hardware issue.
Since there are several reasons that your PC might be shutting off by itself during the boot process, it's important that you step through a logical troubleshooting process like the one I've described below.
  1. Troubleshoot the cause of the beep code, assuming you're lucky enough to hear one. A beep code will give you a very good idea of exactly where to look for the cause of your computer turning off.

    BIOS beep code
    "One day I turned on my PC and it started beeping at me! After a bit of research, I found out that the long beep that I heard meant that my memory was damaged."
    If you don't resolve the problem that way, you can always return here and continue troubleshooting with the more generic information below.
  2. Verify that the power supply voltage switch is set correctly. If the input voltage for the power supply does not match the correct setting for your country, your computer may not stay powered on.

    Chances are your computer wouldn't power on at all if this switch is wrong but an incorrect power supply voltage might also cause your computer turn off by itself.
  3. Check for causes of electrical shorts inside your computer. This is very often the cause of the problem when the computer powers on for a second or two but then powers off completely.

             It's very, very important that you spend the time necessary to inspect the inside of your computer for issues that can cause shorting. If you don't take the time to troubleshoot this possibility thoroughly you may end up missing a simple electrical short and instead performing costly hardware replacements later on for no good reason.

  4. Test your power supply. Just because your computer came on for a few moments doesn't mean that the power supply unit in your computer is working properly. In my experience, the power supply tends to cause more problems than any other piece of hardware and is very often the cause of a computer turning off by itself.

    Replace your power supply if it fails any of your tests.
  5. Test the power button on the front of your computer's case. If the power button is shorting out or even just sticking to the case, it might be the reason your computer is turning off by itself.

    Replace the power button if it fails your testing or if you suspect it's not working properly.
  6. Reseat everything inside of your computer. Reseating will reestablish all of the connections inside your computer which may have wiggled loose over time.
    Try reseating the following and then see if your computer stays on:
    • Reseat all internal data and power cables
    • Reseat the memory modules
    • Reseat any expansion cards
    Note: Unplug and reattach your keyboard and mouse as well. There is little chance that either one is the cause of this problem but we shouldn't overlook them while we're reseating everything else.
  7. Reseat the CPU only if you suspect that it might have come loose or might not have been installed properly.
    Note: I call this out separately only because the chance of a CPU coming loose is very slim and because installing one is a sensitive task. This isn't a big concern if you're careful so don't worry!
  8. Start your PC with essential hardware only. The purpose here is to remove as much hardware as possible while still maintaining your computer's ability to power on.
    • If your computer turns on, and stays on, with essential hardware only, proceed to Step 9.
    • If your computer continues to turn off by itself, proceed to Step 10.
    Important: This troubleshooting step is easy enough for anyone to complete, takes no special tools, and could give a lot of very valuable information. This isn't a step to skip if, after all the steps above, your computer is still shutting off by itself.
  9. Reinstall each piece of nonessential hardware, one component at a time, testing your computer after each installation.
    Since your PC powered on with only the essential hardware installed, those components are working properly. This means that one of the devices you removed is causing your computer to turn off by itself. By installing each device back into your computer and testing after each installation, you'll eventually find the hardware that caused your problem.
    Replace the faulty hardware once you've identified it. These Hardware Installation Videos might come in handy as you're reinstalling your hardware.
  10. Test your PC using a Power On Self Test card. If your computer continues to power off by itself with nothing but essential PC hardware installed, a POST card will help identify which piece of remaining hardware is to blame.
    If you don't already own and are unwilling to purchase a POST card, skip to Step 11.
  11. Replace each piece of essential hardware in your computer with a "known good" identical or equivalent spare piece of hardware, one component at a time, to determine which piece of hardware is causing your computer to shut off automatically. Test after each hardware replacement to determine which device is faulty.
    Note: Most normal computer users don't have a collection of working spare computer parts at their disposals. My advice is to revisit Step 10. A POST card is not expensive and is a much more reasonable approach than stocking spare computer parts.
  12. Finally, if all else fails, you'll likely need to seek professional help from a computer repair service or from your computer manufacturer's technical support.
    Unfortunately, if you're without a POST card and also without spare parts to swap in and out, you're left not knowing which piece of your essential computer hardware is faulty. In these cases you have little option than to rely on individuals or companies that do have these resources.